
I consider few skills more beneficial than language learning. Languages open your doors to whole new worlds. Learning German and then Spanish and Catalan, this wealth of opportunity quickly, shall we say, addicted me. I’ve since started working on Chinese, Russian and French. The problem is that the hours of immersive communicative practice necessary to learn a language can get pricey if you aren’t in that country. These days, though it still isn’t to a level that can completely replace verbal interaction, you can use ChatGPT as a supplement to your spoken language learning for just about any language.
This article is a step-by-step guide for setting up a vocal interface with which to communicate with ChatGPT on a Windows desktop. It is for people with minimal technical and programming knowledge. It requires Python and the OpenAI API, the latter of which is a paid service (though incredibly inexpensive for the purposes described here). The steps will go over obtaining these two things.
Step 1: Install Python on Your Computer

Python is a programming language that is easy to use and good for the purposes of this simple program. To install it on your computer:
- Go to Python.org/downloads and download the executable installer for the latest version.
- Once it’s downloaded, open the .exe file and follow the installer’s instructions.
- Select Install Now to install Python with the features necessary for this project. If for whatever reason you choice to customize your install, make sure you’ve checked Use admin privileges… and Add python.exe to PATH. Additionally, in the optional menu, you need to check pip and py launcher.

Step 2: PIP Your Python Dependencies
This verbal interface program we’re going to create requires several Python dependencies that probably aren’t already on your computer. They are:
- openai
- SpeechRecognition
- pyaudio
- pyttsx3
To get these dependencies:
- Open a Command Prompt on your computer by typing cmd in the search box and clicking on the Command Prompt result.

- In the command prompt, type pip install openai. Click enter. Loading bars and data should flash across the screen for a moments before returnting to the blinking cursor at the command line.
- Repeat this process for all the dependencies listed above.
Step 3: Obtain Your OpenAI API Key
The API Key is what allows your program to communicate with ChatGPT using your account (and billing information). Make sure to keep your key secret and never provide it in public forums. To get your API Key:
- Go to platform.openai.com. If you do not already have an account, make one or continue with your Google or Microsoft account.
- On the left-hand menu, beneath User click on API keys.

- Once on the API keys page, click on the button labeled + Create new secret key. Name the key something like “Language Tutor” and click Create secret key.

- The website will generate a key for you in the same dialogue box. Copy this key into a text document or something similar because you won’t be able to see it again after you click Done. If you accidentally lose the key, simply delete it from the list and create a new one.
IMPORTANT: The OpenAI API is a paid service. OpenAI often gives a certain amount of free usage to new customers, but if you run out or don’t receive any, this program won’t work without adding billing info. You can then set limits on how much API you can use in a month. Generally, this program uses very little. For example, I spent around an hour the other day speaking to ChatGPT in French and German, and it cost $0.21. Your costs may differ based on how many messages are sent and computational requirements.
Step 4: Find and Select Your Desired Voice ID
Your computer has voices for the languages you have installed on your computer. You want to use the corresponding language’s voice because if the English text-to-voice tries to read ChatGPT’s Russian response, it’s going to sound silly bordering on unintelligible. If you do not already have the language your learning installed on your computer:
- Go to Time & language under Windows Systems Settings. Next go to Language & region.
- Click the button labeled Add a language. Select your desired language and wait for it to install, which can take some time.

With the language installed on your computer, you now need to find the location of the voice in your directory. You’ll have to plug this into your computer later. You can get the locations of these voices in one of two ways.
Through the Registry Editor
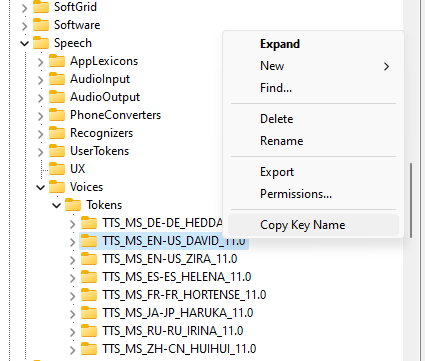
The voices are generally located at HKEY_LOCAL_MACHINE\SOFTWARE\Microsoft\Speech\Voices\Tokens and then labeled by language code. (EN-US is American English, FR-FR is French French, etc.). To get here:
- Open the Registry Editor by typing regedit in the search box and selecting the Registry Editor application.

- On the left side, you will see a dropdown scheme of folders. Open the subdirectories by clicking on the arrows. First open HKEY_LOCAL_MACHINE, then SOFTWARE, etc. until your reach the Tokens folder.
- Still opperating only in the left-hand menu column, right click on the voice you want to use corresponding to the language you’re learning. Click Copy key name. Put this in the text document with your API key because you’ll need it later.
With a Python Script
You can actually run a Python script to give you a list of all the voices on your machine:
- Copy this Python code:
import pyttsx3

engine = pyttsx3.init()
voices = engine.getProperty('voices')
for voice in voices:
    print("Voice:", voice.name)
    print(" - ID:", voice.id)
    print(" - Languages:", voice.languages)
    print(" - Gender:", voice.gender)
    print(" - Age:", voice.age)
- Paste it into a notepad document and save it as a .py file (localvoices.py for example).
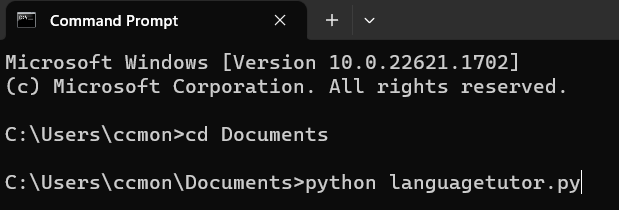
- Open the Command Prompt. Make sure you’re in the folder where you saved the file (Documents for example). If you’re not, use the cd command to get there.
- Once in the correct folder, type python [filename].py.

- The program will produce all the local voices on your computer. Copy the ID of the one corresponding to the language you’re learning and copy it into the text document where you’re saving your API key as you’ll need it later.

Step 5: Create the Python Script and Fill in Info
Now you have everything to create the actual program:
- Copy the following code into a notepad document:
#!/usr/bin/env python3

'''
    Speak with ChatGPT!

    Dependencies:
        - openai
        - SpeechRecognition
        - pyaudio
        - pyttsx3
'''

import openai
import speech_recognition as sr
import pyttsx3

openai.api_key = "[YOUR OPENAI API KEY]"
MODEL_ENGINE = "text-davinci-003"
USER = "USER"
AI = "ChatGPT"


class SpeakAI(object):
    def __init__(self):
        self.r = sr.Recognizer()

    # given text, read it out loud using Google Assistant.
    # Return if the user still wants to continue the conversation
    def speak_text(self, text):
        try:
            engine = pyttsx3.init()
            engine.setProperty('voice', '[YOUR DESIRED VOICE ID]')
            engine.say(text)
            engine.runAndWait()
        except:
            return False
        return True

    def get_response(self, prompt):
        response = openai.Completion.create(
            model=MODEL_ENGINE,
            prompt=prompt,
            temperature=0.5,
            max_tokens=1024,
            top_p=1.0,
            frequency_penalty=0.0,
            presence_penalty=0.0
        )

        # return converted text
        return response.choices[0].text.strip()

    def get_conversation(self, conversation_history, AI, n=10):

        # if conversation is too long, take the last n prompts to be provided as history to the AI agent
        conv_len = len(conversation_history.split("::"))
        if conv_len > n:
            conversation_history = "::".join(conversation_history.split("::")[-(n):])

        response = self.get_response(conversation_history)

        # label response as the AI response. To be appended to conversation history
        response = response.split("::", 1)[1] if "::" in response else response
        conversation_history += "{0}:: {1} ".format(AI, response)

        return conversation_history, response

    def run(self):
        conversation_history = ""   # start a new conversation
        while True:
            try:
                with sr.Microphone() as source:

                    print("{0}: (Ask anything from ChatGPT ...)".format(USER))
                    self.r.adjust_for_ambient_noise(source)
                    # listen for USER input
                    audio = self.r.listen(source)

                    # Using Google Assistant to recognize audio
                    inputText = self.r.recognize_google(audio, language='[YOUR DESIRED LANGUAGE CODE]')
                    inputText = inputText.lower()
                    conversation_history += "{0}:: {1}. ".format(USER, inputText)

                    conversation_history, chatGPT_response = self.get_conversation(conversation_history, AI, n=10)

                    print("{0}: {1} ".format(AI, chatGPT_response))
                    try:
                        continue_conversation = self.speak_text(chatGPT_response.split("::", 1)[1])
                    except:
                        continue_conversation = self.speak_text(chatGPT_response)

                    if not continue_conversation:
                        print("\n\n #### Program terminated. Please find the transcript below. ####\n")
                        print(conversation_history)
                        break

            except sr.RequestError as e:
                print("Could not request results; {0}".format(e))

            except sr.UnknownValueError:
                print("Unknown error occurred!")

            except KeyboardInterrupt:
                print("\n\n #### Program terminated. Please find the transcript below. ####\n")
                print(conversation_history)
                break


if __name__ == "__main__":
    AI_agent = SpeakAI()
    AI_agent.run()
- You’ll note three places with brackets. Replace the placeholders there (including the brackets) with your info.
- Replace [YOUR OPENAI API KEY] with the API key you copied in step 3.
- Replace [YOUR DESIRED VOICE ID] with the voice ID you copied in step 4.
- Replace [YOUR DESIRED LANGUAGE CODE] with the ISO Language Code for the language your learning. Since there’s a separate code for each country where they speak a given language and some others, you can find a longer list here, but these are some of the most common:
- Spanish (Spain): es-ES
- Spanish (Mexico): es-MX
- French (France): fr-FR
- Italian (Italy): it-IT
- Arabic (Saudia Arabia): ar-SA
- Japanese (Japan): jp-JP
- Korean (Korea): ko-KR
- Portuguese (Portugal): pt-PT
- Portuguese (Brazil): pt-BR
- Russian (Russia): ru-RU
- Turkish (Turkey): tr-TR
- Chinese (Mainland China): zh-CN
- Chinese (Taiwan): zh-TW
- Save the document as a .py file (languagetutor.py for example) in an easily accessible folder like Documents.
Step 6: Run the Program
Now you’re ready to talk to ChatGPT!
- Open a Command Prompt. Use the cd command to make sure you’re in the folder where you saved the file. Then type python [filename].py. Press enter.
- If it’s working, it should display USER: (Ask anything from ChatGPT …).

- You should be able to speak to ChatGPT, and the program will print ChatGPT’s responses in the Command Prompt as well as reading them aloud.

Limitations to This Approach
I recommend using ChatGPT as a fun supplement to your other language learning strategies. The main issue is that with the API, you still only have access to ChatGPT-3, who is frankly kind of a moron. 4 is much smarter and better at consistently correcting your mistakes and providing unknown words (as long as you’ve given it these instructions).
That said, even GPT-4 could not capture the nuances and rhythms of real human conversation. If you truly want to learn a language, you need to be interacting verbally in that language with native speakers on a regular basis.

Note: This is an affiliate listing, and I may receive a commission if you purchase the product. These commissions allow me to continue writing, giving you an optional way to support me and my content. I never recommend books or other products that I have not read or used personally.